Archiving: Hands-on!
In this blog post, we'll walk you through using Archiving, our latest cool feature, available from KurrentDB 25.0.
Archiving can save you a tremendous amount of disk space on your KurrentDB nodes by moving old chunk files from the local disk to an external archive such as S3.
Archiving is simple to configure and use! From a user's point of view, there is nothing special about the data in the archive, it reads like any other data, it's just a bit slower due to the latency of the underlying object store.
Hot & Cold
It is not uncommon for KurrentDB databases that have been running for several years to have tens of thousands of chunk files, easily consuming several terabytes of disk space. Most users run KurrentDB as a 3-node cluster for high availability, thus tripling the total amount of disk space required. Add a few more terabytes due to the indexes, and you can often find yourself needing to expand your disks and paying a massive bill to your cloud provider every month (or if you are on-premise, getting an 'oh-no-not-this-again' phone call from your infrastructure manager!)
If you need to reduce your data's size, the first step is often to delete old data that no longer holds any value to free up disk space by setting stream metadata ($maxAge, $maxCount, $tb, etc.) followed by running a scavenge. But there are cases where you cannot, or might not want to, delete old data. After all, one of the fundamental benefits of event sourcing is keeping a perfect log of all the state changes from the first day the system was deployed.
Out of all the data accumulated over several years, recent data usually holds much more value than older data. For example, in an e-commerce application, users are much more likely to view recent orders instead of orders they made ten years ago.
The recent data that is frequently accessed is called the hot data, while the old data that is rarely accessed is called the cold data. When we keep the hot and cold data together on a fast, expensive disk, we're not using our resources optimally, resulting in higher costs.
What if we could separate the cold data from the hot data by making the cold data still accessible but at slower speeds on a cheaper disk? This is the primary motivation behind the Archiving feature!
In addition to reducing costs, Archiving improves scalability. Previously, all cluster data had to be stored on the drive attached to each node. In environments with volume size limits — such as a few terabytes — large databases could quickly reach capacity. With Archiving, this limitation is eliminated.
Defining what's Hot and what's Cold
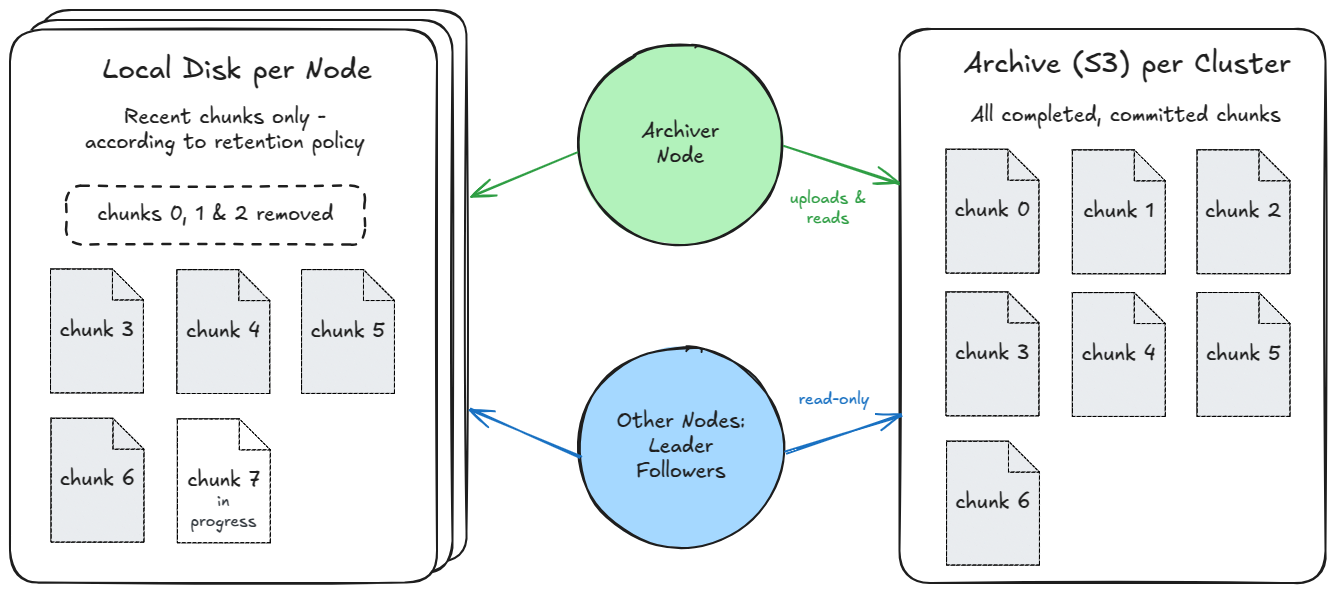
In KurrentDB, the tail of the transaction log, i.e., the latest chunk files, often naturally represent most of the hot data, while old chunk files often represent most of the cold data. Thus, the basic idea is to keep the latest X chunks on the local disk based on a user-defined retention policy. For simplicity, instead of storing only old chunks in the archive, we actually store all completed & committed chunks in the archive, regardless of the user-defined retention policy.
The user-defined retention policy is simple: Keep at least X days and at least Y bytes of chunk data locally. To determine proper values for X & Y, there are some built-in metrics in KurrentDB.
You may also observe that there could be some hot data present in the old chunks. In this initial release of Archiving the hot data will be read repeatedly from the archive. Future releases may improve on this with a local cache.
The Archiver node
Using Archiving requires adding a new node, called the Archiver node, to the cluster. This node is responsible for uploading chunks to the archive.
An archiver node is like a normal database node, except that it is designated as a read-only replica and as an archiver:
ReadOnlyReplica: true
Archiver: true
You might say, "Wait a minute! Adding a new node means using even more disk space, right? And this defeats the purpose as our original objective was to reduce disk space."
The above statement may be valid for a short time when you first start to use archiving. But with time, as chunks are uploaded to the archive, disk space will be freed from all the nodes, including the Archiver node.
Usually, the hot data is much smaller than the cold data. Therefore, the disks on the nodes can be kept relatively small, and the space used by the extra node will not be significant. Note that there's also only one copy of the data in the archive.
Demo time!
We'll use Linux for this demo, but the steps should be quite similar on Windows.
Enabling archiving is simple. Just add a few lines to your KurrentDB configuration file (located at /etc/kurrentdb/kurrentdb.conf) on all your nodes, including the Archiver node:
Licensing:
  LicenseKey: <your key>

Archive:
  Enabled: true

  StorageType: S3
  S3:
    Region: eu-west-1
    Bucket: kurrentdb-cluster-123-archive

  RetainAtLeast:
    Days: 30
    LogicalBytes: 500000000
The configuration settings are straightforward - we first specify a license key and then enable archiving. We then specify the storage type. Currently, we support only Amazon S3. If you want us to support additional cloud providers, we would be happy to hear from you! Then, we specify the S3 region and the S3 bucket where chunks will be archived.
Finally, we specify the retention policy. Here, it means:
Keep the last chunks containing data that is not older than 30 days
or keep the latest 500MB of data, whichever is larger
We keep roughly two chunks of data or more depending on the data's age.
S3 Authentication
You may have noticed that we haven't specified any credentials to authenticate with S3. In a development environment, you can simply log into the aws-cli with the user that you're running KurrentDB as using the aws configure command.
AWS supports many authentication methods, including IAM user credentials, single sign-on, and EC2 instance metadata. In KurrentDB, we internally use the AWS SDK for .NET, which, like the other AWS SDKs, searches for the credentials in a specific order from environment variables or certain well-known file paths.
For the demo, we will use IAM user credentials (commonly used with aws-cli), but it's NOT recommended for production use:
$ sudo -u kurrent bash
$ mkdir -p ~/.aws
$ cat > ~/.aws/credentials <<EOF
[kurrentdb-archive]
aws_access_key_id = ********************
aws_secret_access_key = ****************************************
EOF
The above commands configure an AWS profile named kurrentdb-archive in the kurrent user's home directory, located at /var/log/kurrentdb.
You must replace the asterisks with your actual Access Key ID / Secret Access Key. Note that these credentials must have read/write access to the S3 bucket. (More on this below).
S3 Authentication in Production
AWS IAM user credentials (used above) are permanent credentials that do not expire and pose a security risk. The following methods are more suitable for production environments, depending on where KurrentDB is running:
- On Amazon EC2: IAM Roles for Amazon EC2
- On-premise or outside AWS: IAM Roles Anywhere
- You need to create a
credential-processprofile that runs the AWS signing helper to fetch temporary credentials - You can use your existing KurrentDB CA certificate as a trust anchor & your node's certificate with the AWS signing helper.
- You need to create a
These authentication methods use temporary credentials that expire after a few hours. Thus, even if the credentials are leaked, they will have no value in a few hours. The SDK automatically refreshes the credentials when they expire.
Additionally, we recommend to use a more fine-grained AWS policy instead of giving full read/write access to S3:
- The Archiver node needs read/write access to the archive bucket only
- Other nodes needs read-only access to the archive bucket only
Running the nodes
Our configuration is almost complete!
We just need to pass the AWS profile we created (kurrentdb-archive) as an environment variable to KurrentDB. If you are using the default AWS profile, default, you don't need to complete these steps.
Specifying the AWS_PROFILE environment variable can be done as follows:
$ sudo systemctl edit kurrentdbThis will open up a text editor, where you must add these lines in the top section:
[Service]
Environment="AWS_PROFILE=kurrentdb-archive"
Save the file & exit.
Finally, reload the systemd configuration by running:
$ sudo systemctl daemon-reloadWe're now ready to spin up the nodes, including the Archiver node!
$ sudo systemctl restart kurrentdbThe Archiver at work
After starting the nodes, nothing special happens at first sight on the cluster nodes. If the archive settings were misconfigured, you will likely see errors as soon as the nodes start up.
If you look at the logs of the Archiver node, you'll see that it has joined the cluster and started replicating chunk files from the leader as a normal node would. You'll notice this line saying that the archive has a checkpoint of 0 (0x0 in hex notation):
[INF] ArchiverService Archive is at checkpoint 0x0The archive checkpoint represents the point in the KurrentDB transaction log before which everything has already been added to the archive. Therefore, chunks before the archive checkpoint can safely be deleted from all nodes. The checkpoint is measured in bytes. For example, a checkpoint of 0x10000000 means 268435456 bytes in decimal, which is exactly 256 MiB (1 chunk) It is stored as a file named archive.chk in the S3 archive.
You'll also notice lines like this:
[INF] ArchiverService Storing chunk in archive: "./chunk-000000.000000"
[INF] ArchiverService Setting archive checkpoint to 0x10000000
...
[INF] ArchiverService Storing chunk in archive: "./chunk-000001.000000"
[INF] ArchiverService Setting archive checkpoint to 0x20000000
...
[INF] ArchiverService Storing chunk in archive: "./chunk-000002.000000"
[INF] ArchiverService Setting archive checkpoint to 0x30000000
And if you look at your S3 bucket, you'll see that chunks have already started rolling into the archive:
$ aws s3 ls s3://kurrentdb-cluster-123-archive/
2025-03-20 11:39:03          8 archive.chk
2025-03-20 11:22:09  268439552 chunk-000000.000001
2025-03-20 11:26:27  268435456 chunk-000001.000001
2025-03-20 11:30:46  268435456 chunk-000002.000001
One strange thing you'll notice above is that the chunk file names in the archive always have a suffix of .000001. For example, chunk-000000.000000 is stored as chunk-000000.000001, which looks similar to a scavenged chunk.
The other strange thing you'll see is that if you have a scavenged and merged chunk that contains multiple logical chunks, it'll be stored as several chunk files in the archive. For example, scavenged chunk chunk-000012.000003, which contains chunks 12, 13, and 14, will be unmerged and stored in the archive as chunk-000012.000001, chunk-000013.000001, and chunk-000014.000001.
This mechanism allows data to be read from the archive quickly. A constant suffix (.000001) and one chunk file per logical chunk allow any node to quickly locate the chunk file containing a specific log position in the archive. This has some (minor) implications: When you use Archiving, you cannot easily tell from a directory listing of the archive:
- whether a chunk was scavenged or not
- the number of times a chunk was scavenged (this information is local to a node anyway)
After some time, all the completed chunks will have been uploaded to the archive. Great, let's jump to the other nodes to see what's going on!
Deleting archived data locally
Doing a directory listing of one of the follower or leader nodes shows nothing special - all of the chunks are still here (there are only six chunks in total for this demo):
$ ls /var/lib/kurrentdb/
chaser.chk           chunk-000002.000000  chunk-000005.000000  proposal.chk
chunk-000000.000000  chunk-000003.000002  epoch.chk            truncate.chk
chunk-000001.000000  chunk-000004.000000  index                writer.chk
Hmmm, how do we get rid of the local chunks already in the archive? The answer is: run a scavenge!
Let's try it out: we click on the scavenge button on the UI, but...nothing seems to happen - all the chunks are still there. Hmmm, what could be the cause? Remember, our retention policy is to keep chunks with data that is less than 30 days old!
A quick peek at the logs shows that this was the reason the chunks were kept:
[DBG] SCAVENGING: ChunkRemover is keeping chunk "#0-0 (chunk-000000.000000)"
because of the retention policy for days
[DBG] SCAVENGING: ChunkRemover is keeping chunk "#1-1 (chunk-000001.000000)"
because of the retention policy for days
30 days later...
We run a scavenge again 30 days later and sure enough, some of the chunks (0, 1, 2, and 3) are deleted from the node!
$ ls /var/lib/kurrentdb/
chaser.chk           chunk-000006.000001    index         writer.chk
chunk-000004.000000  chunk-000007.000000    proposal.chk
chunk-000005.000001  epoch.chk              truncate.chk
Notice that we configured the archiving settings to keep only 500MB of data, which should be roughly equivalent to two chunks, but four chunks are left. That's because running a scavenge (two times) had closed chunks 5 and 6 with a scavenge point, and they were thus not full of data.
If you now read some streams from a client or the web UI, you'll notice that reads that go to the archive are handled transparently!
Limitations
This initial release has several limitations that we intend to improve in future releases:
Completed, will be available in 25.1
- The headers of archived chunks are read on startup, just as for local chunks. This will increase startup times significantly when there are a lot of chunks in the archive.
In Progress
- Requests that read the archive can cause other reads to be queued behind them, resulting in higher read latency if the archive is being accessed frequently.
Planned
- Once uploaded to the archive, the chunks there are not scavenged any further.
- Clients cannot yet opt out of their read reading from the archive.
- Repeated reads of the same part of the archive are not cached locally.
Planned, according to interest
- At the moment only S3 is supported. A local file-system based archive exists for development/testing purposes.
- Redaction is not compatible with Archiving.
Conclusion
This was a small introduction to Archiving. Many questions may have popped up in your head, for example:
- How do I determine the proper values for the retention policy?
- How do backups work?
- Are the indexes also archived?
You can learn more about the nitty-gritty details in the documentation.